The Professional’s Guide to Expanding Water Storage: How to Connect Multiple Tanks Seamlessly
There is a specific kind of satisfaction that comes with watching your first water storage tank hit the "full" mark. But for most property owners, that feeling is quickly followed by a realization: I’m going to need more room.
Whether you’re a farmer bracing for a dry Tennessee summer, a gardener looking to capture every drop of spring rain, or an industrial manager scaling up operations, your storage needs rarely stay static. But here is the thing, expanding your system isn’t as simple as just "daisy-chaining" a few units together and calling it a day. If you’ve ever browsed a DIY forum, you’ve seen the horror stories: water tanks that won't fill to the top, "dead water" that turns stagnant and smelly, or rigid PVC pipes that snap the moment the ground shifts under a 5,000-pound load.
At Tank Depot, we believe expansion should be a one-and-done project. In this guide, we’re moving past the "quick-fix" methods and diving into the professional logic of manifolding and cross-flow plumbing. We’ll show you how to link multiple units into a single, high-performance reservoir that’s easy to maintain, simple to isolate, and—most importantly—built to last.
Ready to grow your water capacity? Let’s get into the engineering logic that makes it happen.
Planning Your Water Tank Expansion: The "Golden Rules" of Capacity
Before you start drilling holes or buying fittings, you need to understand the "logic of the water level." When you connect two or more tanks at the bottom, they effectively become one single vessel. This brings us to our first rule of bulk water storage expansion.
Do my rainwater tanks need to be the same size?
The short answer is: No, but their heights matter more than their volumes. This is due to the principle of Atmospheric Equilibrium (or "communicating vessels"). In a linked system, water will always seek the same level across all water tanks, regardless of their shape or total capacity. If you connect a 250-gallon water tank to a 1,000-gallon rainwater tank, they will fill and drain in unison.
However, you must account for the "Lowest Rim" Rule. If your new expansion tank is 8 feet tall but your existing tank is only 5 feet tall, the water level will never rise above 5 feet. If you try to force more water in, the shorter tank will overflow while the taller one stays half-empty. To maximize your water storage capacity, always try to match the top-rim heights of your interconnected water tanks or be prepared to adjust your float switches to the lowest common denominator.
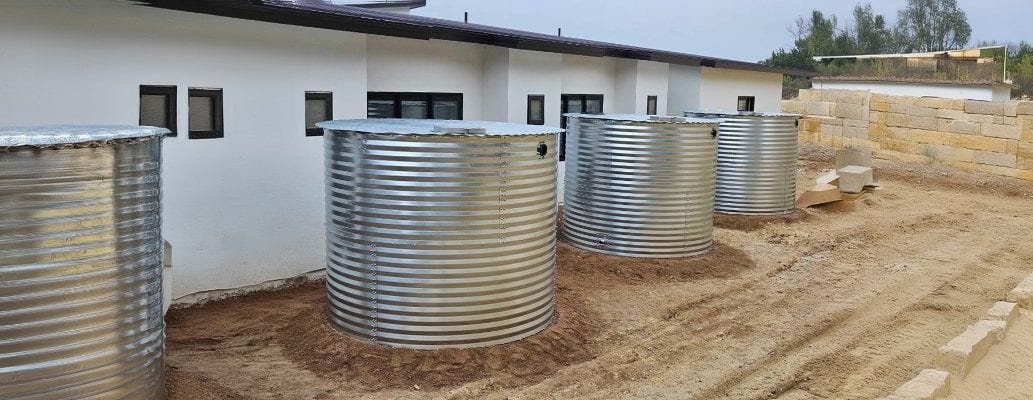
Strategic Tank Placement: Foundation and Footprint
When you add units to a rainwater harvesting system, you aren't just adding plastic; you’re adding massive amounts of weight. Make sure to factor in the Dry Weight (for moving and installing the tank) and the Service Weight (the weight of the tank when full).
While a high-quality 1,000-gallon polyethylene tank from Norwesco or Bushman is light enough for two or three people to move by hand, weighing between 160 lbs and 164 lbs, its weight changes drastically the moment you turn on the pump. Water weighs approximately 8.34 lbs per gallon. This means a single 1,000-gallon tank puts over 4 tons of pressure on your pad. If you are manifolding multiple tanks, this "Total System Weight" is why we prioritize a unified, reinforced foundation.
If one tank is on a 6-inch concrete slab and the expansion tank is on uncompacted gravel, the expansion tank will sink as it fills, shearing your PVC connections right off the bulkhead.
Tank Expansion Specs (Dry vs. Full Weight)
| Tank Model & Capacity | Manufacturer | Dry Weight (Empty) | Service Weight (Filled) |
Foundation Requirement |
| 300 Gal Vertical | Chemtainer | 87 lbs | ~2,589 lbs | Level Gravel / Skid |
| 500 Gal Vertical | DuraCast | 102 lbs | ~4,272 lbs | 4" Reinforced Concrete |
| 1,000 Gal Vertical | Norwesco | 160 lbs | ~8,500 lbs | 6" Reinforced Concrete |
| 1,500 Gal Vertical | Snyder | 215 lbs | ~12,725 lbs | 6" Reinforced Concrete |
| 2,500 Gal Vertical | Snyder | 410 lbs | ~21,260 lbs | Engineered Slab |
| 5,000 Gal Vertical | Bushman | 700 lbs | ~42,400 lbs | Engineered Slab |
Pro-Tip: Always check the Specific Gravity (SG) rating on your storage tank. Most of our standard water tanks are rated for 1.0 SG (water). If you’re storing heavier liquids like liquid fertilizer, you may need a 1.2 SG or 1.5 SG tank, which features thicker walls and a much higher dry weight to handle the increased internal pressure.

Choosing Your Connection Logic: Series vs. Parallel
What is the best way to plumb multiple water tanks?
There are two primary ways to connect your storage units. While both will "hold water," only one is considered a professional-grade setup for long-term water quality.
Series (Daisy-Chaining)
In a series setup, you connect the overflow of Tank A into the inlet of Tank B.
- The Pros: It’s incredibly simple and requires very little pipe.
- The Cons: It’s prone to "stagnation." The first tank in the line does all the work, while the water in the last tank can sit for months, becoming a breeding ground for bacteria. This is only recommended for small, high-turnover garden setups.
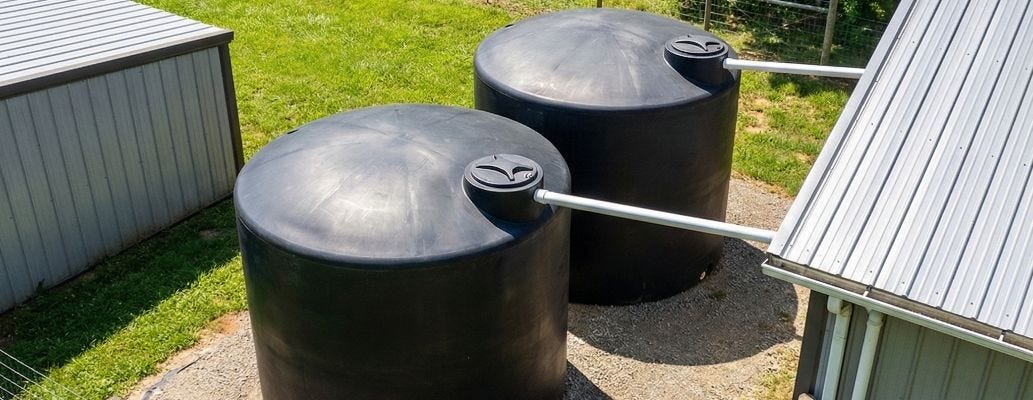
Parallel (The Manifold Method)
This is the our Gold Standard. In this configuration, every tank is connected to a single, common "Header Pipe" (or manifold) at the bottom.
- The Pros: All tanks fill and drain at the same time, maintaining equal pressure.
- The Cons: Requires more fittings, specifically high-quality bulkhead fittings and isolation valves for each water tank.
The Pro Move: Cross-Flow Plumbing
To truly outperform a standard DIY setup, we recommend the Cross-Flow Method.
- Inlet: Plumb your incoming water source (from your roof or well) into the top of Tank 1.
- Outlet: Plumb your pump suction/outlet from the bottom manifold of the furthest tank (e.g., Tank 3).
The Logic: By separating the entrance and exit points, you force the water to travel through the entire manifold system. This prevents "dead zones" and ensures that every gallon in your 5,000+ gallon array is fresh and oxygenated.
Don't Forget the "Balloon Effect": Tie-Down Lugs
As we noted in the weight section, a Norwesco 1000 Gallon tank only weighs about 160 lbs when empty. Because these polyethylene tanks are so light, they can easily be shifted by high winds or even float if they are in a flood-prone area.
Most of our premium tanks, such as the Enduraplas 2000 Gallon and Snyder Vertical models, feature molded-in tie-down lugs.
Pro Tip: Even if your manifold is heavy-duty, never rely on your plumbing to "hold the water tank down." Use high-tensile cables or straps attached to these lugs and anchored into your concrete pad. This ensures your system stays put during a storm when the tanks might be near empty.
Step-by-Step: How to Connect Your New Tank to an Existing One
Step 1: Drain and Prep the ExistingSystem
Before you touch a drill, you need a dry workspace. Drain your existing tank below the level of your intended hole.
- Isolate Your Pump: Turn off the power and close the suction valves.
- Clear the Footprint: Ensure the area between the rainwater harvesting tanks is free of debris. As we discussed, any unevenness will put immediate stress on your new plumbing.
Step 2: Installing the Bulkhead Fittings
The bulkhead fitting is the most critical component in your system. It is what allows a pipe to pass through the tank wall without leaking.
- The "Anatomy" of the Seal: A bulkhead consists of a body, a gasket, and a nut. Crucial Rule: The gasket always goes on the inside of the tank against the flange for a standard install.
- The Cut: Use a hole saw slightly larger than the bulkhead threads. For example, a 2" bulkhead typically requires a 3" hole saw (check your specific fitting specs).
- Sealing the Threads: Apply a generous amount of high-quality thread tape or a non-hardening thread sealant to the male threads of your adapters to ensure a watertight bond.
Step 3: Building the Manifold
Now, you’ll connect the water tanks to a common "Header Pipe."
- Use Isolation Valves: Install a high-quality ball valve immediately after each bulkhead. This allows you to "lock off" any single tank for cleaning or repairs without losing your entire water reserve.
- The "Flex" Factor: Never use rigid PVC to bridge two tanks directly. Even a 1/4-inch shift in the ground (common under the weight of a DuraCast 4000) will snap a rigid pipe.
- How to use "Z-bends": If you don't use a reinforced flex-hose, create a "Z" or "U" shape with your PVC elbows. This geometry allows the pipe to flex slightly like an accordion rather than snapping at the joint.
Step 4: Balanced Venting
This is the "secret sauce" of professional installations. If you draw water out of the bottom manifold, air must enter the top of the tanks to replace it.
- The Vacuum Effect: Without proper venting, your pump can create enough suction to actually implode a poly tank, especially thinner-walled models.
- The Solution: Don't just vent each water tank individually. Run a small "breather line" (usually 1" or 1.5" pipe) that connects the air space at the top of all tanks. This ensures that as the water level drops in one, the pressure stays equal across the entire array, preventing "glugging" or airlocks in the manifold.
Scaling Your Water Independence with Tank Depot
Expanding your water storage capacity from a single reservoir to a professional-grade tank farm is one of the best ways to secure your property's resilience. By moving away from simple daisy-chaining and toward a parallel manifold system with cross-flow logic, you aren't just storing more water, you’re storing better water.
As you finish your installation, remember the "final touch" of professional plumbing: patience. When threading your large-diameter fittings into your Snyder setups or Norwesco tanks, be mindful of thread galling. Polyethylene fittings can heat up and "fuse" if forced or cross-threaded. Hand-tighten your connections first, and only use a wrench for that final quarter-turn.
With the right foundation, a flexible manifold, and a balanced venting system, your expanded storage will be ready to handle whatever the seasons throw at it.